Algonquin Park: Track & Tower Trail/ Whiskey Rapids (Sept. 26th & 27th, 2016)

Well, what a difference a year makes. No blog entries from me, no trips, no hikes (until this one, of course), BUT! – we did have a baby, so… y’all can understand why we had to take a bit of a breather. Now, baby is almost a year old, so we got him out on the trail as soon as we could and… he loves it! I mean… this kid L.O.V.E.S. being outdoors. Thank the Big Spirit in the sky for that.

And, before I dig into this short excursion, I’d just like to thank all y’all who’ve been checking this blog out while I’ve been away. The numbers don’t lie and it’s clear that there are a lot of you out there who are interested in these trails and parks, so keep checking back to see what new parks and routes get added.

img_9948
Whiskey Rapids Trail, Algonquin Park 2016


Not only has life been busy with the recent addition of our little boy, work has kept me going 6 days/week since the winter. Suffice it to say, I’ve been lucky to get a 30 minute walk in once every week or two, let alone a full day of hiking in one of our beloved provincial parks. So, when a rare two-day weekend presented itself, I immediately pitched the idea of a hiking getaway that was received very well and signed off on by the Mama Bear of our clan.

Usually, I’m all about the backcountry and tent/hammock camping but, for many reasons (i.e. – schedule, time of year, child under 1), we opted for the more civilized way of doing things and we got a hotel room in Huntsville and just popped in and out of the park over two days.

It was the beginning of the second peak season in Algonquin because of the fall colours, so we were lucky to get a room at all, and the park was quite busy.

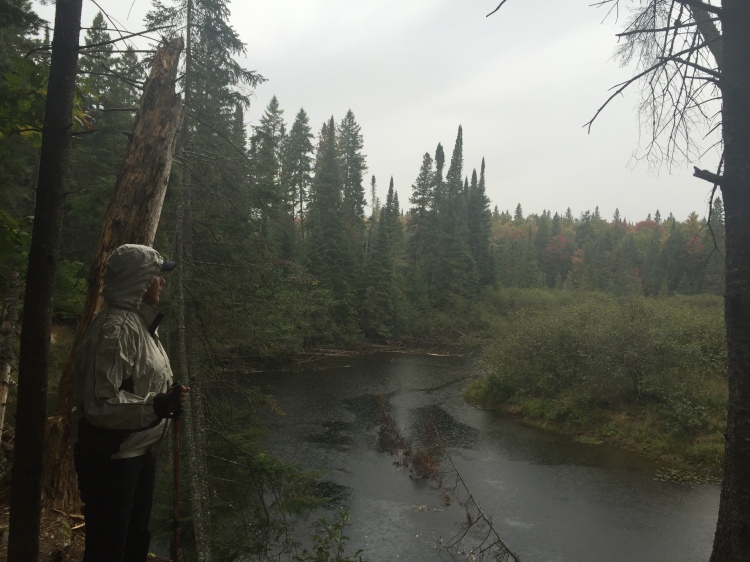
We arrived early on Monday, got to check into our room early as well, and got into the park around noon. It was raining. Rain doesn’t stop us, though. I love hiking and camping in the rain. Well… let me clarify – I like hiking in a light rain and I hate setting up or breaking camp in a downpour but, I do love being in the woods in the rain. There is something about experiencing nature in all of her moods.

img_9952
Our little hiker enjoying his rain gear.

This is my 6th or 7th trip into Algonquin and, to date, I’ve only experienced the “Hwy. 60 Corridor”. I’ve only entered by the West Gate, never made it as far as the East Gate and all of my entry points have been either at the Western Uplands, Highlands Trail or the Canoe/Smoke Lake access point. In a word, my experience of Algonquin over the last 6 years can be described as: limited. Each time I come here, I only have enough time for the trip that I’ve planned and I always see the signs for Whisky Rapids, Track & Tower, Mizzy Lake etc. This time, I resolved to hike at least two more of the Hwy. 60 trails.

Whiskey Rapids is located 7.2 km into the park coming from the West Gate. It’s a 2.1 km loop that follows the Oxtongue River for about half of its length. It’s a quick hike, less than an hour.

img_9955
Viewing the Oxtongue River on the Whiskey Rapids Trail

The Whiskey Rapids gets its name from an incident that occurred (according to the trail guide), at the turn of the 19th century. A few log drivers had chipped in to buy a barrel of whiskey and have it sent to the Canoe Lake railroad station. Upon shipping it home, via the Oxtongue River, the two who had picked it up (and inevitably sampled it before getting it to camp), tried to shoot the rapids and failed. Good thing they tasted it beforehand, because that’s all they would ever get to enjoy from that barrel…

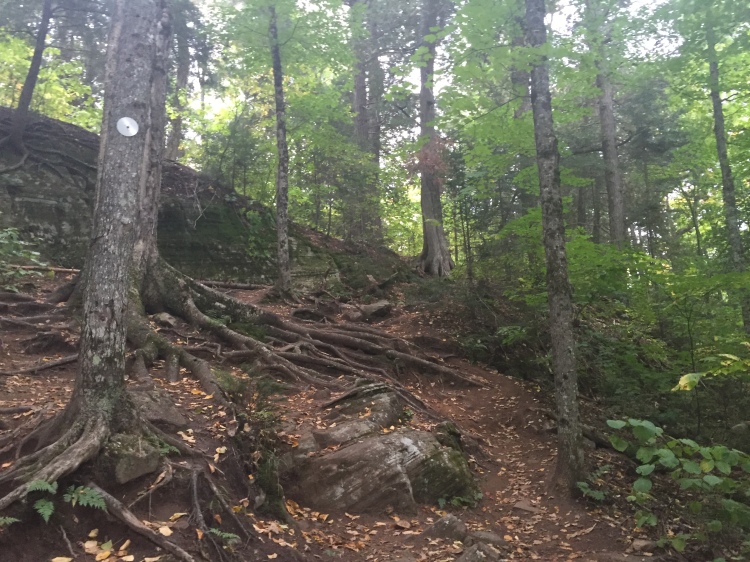
This is a great trail for those who are looking for shorter hikes that aren’t too challenging. Now – a word about the “difficulty rating” of the trails in Algonquin: they are very subjective. In my opinion, every single trail that I’ve been on, so far, has had sections that could be considered “strenuous” or “difficult”, depending on your own personal situation. Me? I have knees that need to be considered and neck/shoulders that constantly require attention in the form of yoga and/or stretches. I always, always hike with poles.

If you’re in your senior years, you should consider every trail to be strenuous inasmuch as there will always be roots and rocks under foot and sharp inclines/declines at any given time. The fact is: if you want to get to a view or a “lookout”, you’re going to have to climb UP. And then, once you’re done, you have to climb back DOWN. It’s the DOWNward climb that I find hardest on the knees.

If you take away one thing from reading any of my blog posts, take this piece of advice: HIKE WITH POLES.

img_9924
An average, well maintained trail. Full of roots and rocks. Slippery when wet.                     HIKE WITH POLES!!

If you have bad knees or a bad back, please don’t let this scare you off from hiking. Just be prepared. Even for a short hike like this, use poles, bring water and a good loud whistle. There are sections of just about every trail that will leave you a bit winded.

Of course, there will be plenty of youthful, vivacious, avid hikers out there who scoff at the idea of using poles or the description of these trails as “challenging”, but… who cares what anyone else thinks, eh? Just getting your butt out there is all that matters.

In the final minutes of our hike, the rain started to come down hard. We got to the truck, dried off, and hit the road to enjoy a bit of a drive along the Hwy. 60 corridor. We checked out a few of the campgrounds, to see what the sites were like. Tea Lake campsite is small and had a number of good sites (although, it was closed for the season). We also checked out Mew Lake for the first time and it’s open year-round. A great place for RV’ers.

We headed back into Huntsville for dinner and a quiet night in at the Best Western. It feels a bit weird to give a hotel review on this blog, but: it was nice and I’d stay there again if I had to. The breakfast was decent. No complaints (except for the peak season price of $200/night). The rooms were modern and well kept.


img_0166
Looking at Cache Lake on the Track & Tower Trail.

The next day brought us better weather. Cool and crisp, but sunny and no rain whatsoever. We packed a lunch of summer sausage and cheese, a few granola bars and 2L of water. The Track & Tower Trail has been on my list for a while, so I was chuffed to get the chance to check that one off (apologies for the alliteration…). The parking lot at the trail head was pretty busy, but once we got on the trail, we only came across 6-8 other hiking parties over the course of the day.

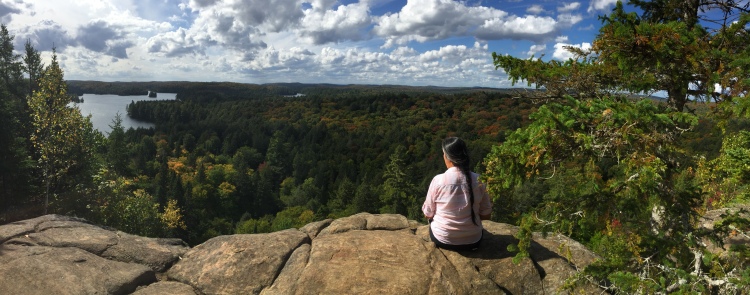
The Track & Tower Trail is 7.5 km, round trip and is well worth the effort. There are many rewarding sights along the way, with the lookout at Post #7 providing an absolute stunning view of the park. The lookout is about 4-ish km in from the trailhead. Truly, one of the best hikes that the park has to offer.

img_0107
The lookout at Post #7 on the Track & Tower Trail.

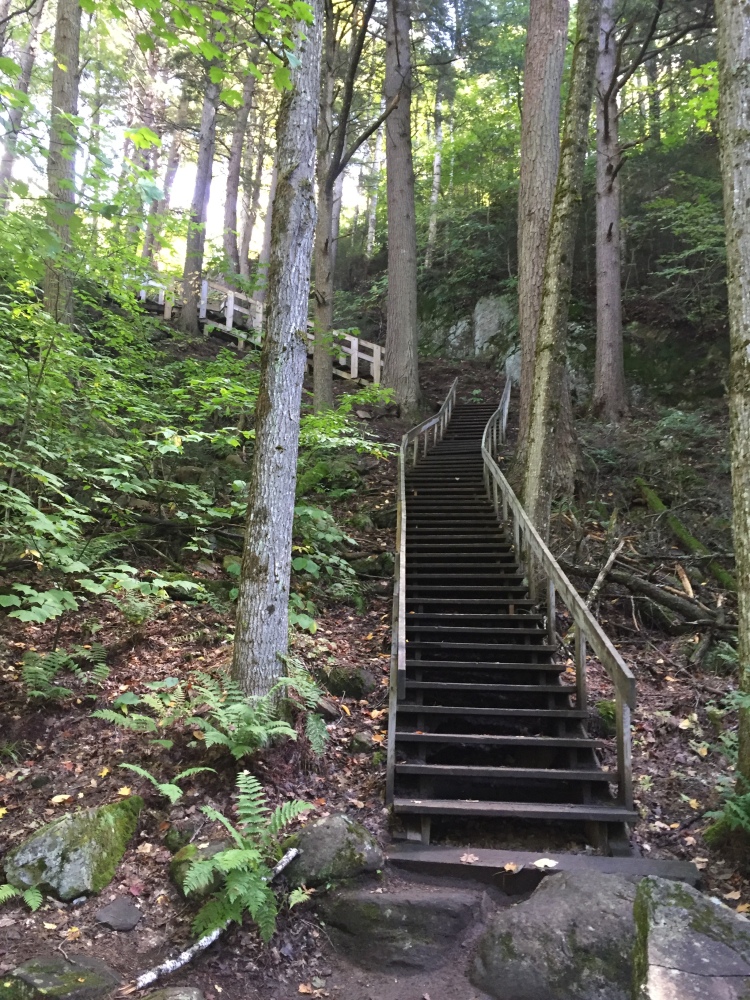
One thing that always strikes me when I’m hiking is the *effort* that gets put into making and maintaining them. When I see a boardwalk several kms into a hike I can’t help but think of the folks who had to shoulder all of the tools and materials there to build it all.

The stairs leading up to the lookout on the Track & Tower Trail are impressive for this very reason. Maybe there’s an entry point that a vehicle can access that gets them closer than the trailhead but, still… that’s a lot of wood and nails to carry. Not to mention the saw…

img_0100
The stairs leading up to the lookout on the Track & Tower Trail.

Shortly after leaving the lookout, you’ll walk over the old railway track at Post #9 and be standing on a completely man-made hill, though, you’d barely be able to tell that it isn’t just a natural part of the landscape. It’s truly amazing how the area has healed itself in the last 100 years since all of the logging action. A testament to nature’s ability to recover from the damage that humans inflict on her.

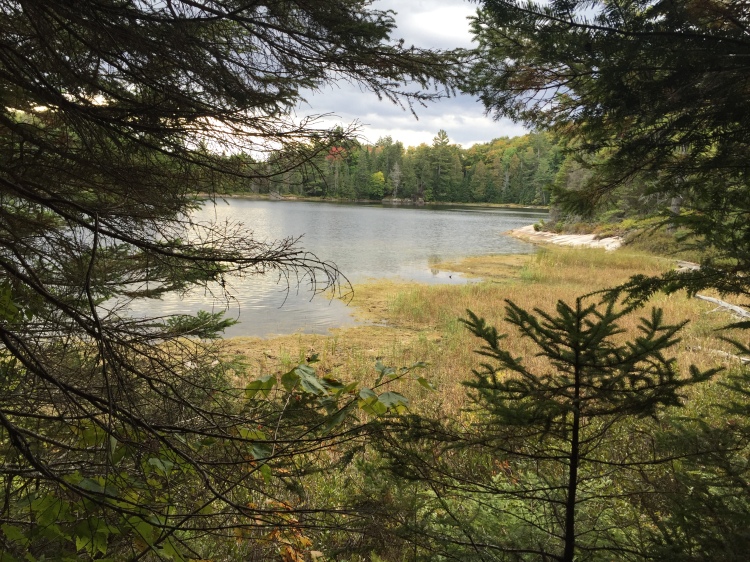
After the railway bridge, you’ll hook up for a short while with the bike trail and then continue on, back into the woods for the final stretch of the Track & Tower Trail that takes you back to the trailhead/parking lot. It’s a good 2.5 kms, and you’ll pass by Grant Lake on your way.

Along this stretch, you’ll pass by a large rock face covered in moss. Our boy loved getting up close and feeling moss for the first time.

All in, with a bit of a break at the lookout and one by the river by the bridge, this hike took about 3 – 3.5 hours. It was a beautiful day and we took our time.

The time estimates given by the park maps seem overly generous. Maybe this is to account for very slow walkers and err on the side of safety.

Thanks again for checking in with Canadian Park Hound! Please check us out on Facebook fb.me/canadianparkhound and give us a “Like”. There are some big changes here that will be announced very soon and Facebook is the only place that I can post the panoramic shots that I take along the way.

Bye, for now! Happy Trails!

Georgian Bay Islands National Park, August 2015

Screen Shot 2015-08-09 at 11.54.57 AM

Well, this was a pleasant surprise. We were cottaging in Honey Harbour for the week and saw the Parks Canada office right across the street from the Town Center general store so, of course, I had to check it out. I had no idea that we were staying so close to a national park. I’d heard of Georgian Bay Islands National Park, but I wasn’t expecting to stumble into it during a cottage trip. There is a small Parks Canada kiosk sitting at the boat launch and we got some info on the Daytripper boat ferry schedule and planned a quick trip.

View from the Daytripper leaving Honey Harbour on the way to Georgian Bay Islands National Park.

For $15/per person, the Daytripper will take you into the park and come back to get you 4 hours later. As mentioned in a previous post, my partner is pregnant, so this was a perfect amount of time for us although, at any other time, 4 hours would feel like a mere “amuse-bouche”. Because of its popularity, the boat is often full, so reservations are highly recommended. You have your choice of several “ports of call” around the island, and we visited the central landing point of Cedar Spring. Here, you will find the Head Office and main campground. There are a few cabins for rent (about $150/night, 2 night minimum) and tent camping sites.

The view from a tent site just behind the main office. A bit too close for my comfort, but still… it’s well maintained and very close to the toilets if you have little ones.

Upon reaching the dock at Cedar Spring, you walk along the boardwalk to get to the main office. Along the way, you’ll pass by a few of the cabins, which are interspersed with tent sites. Personally, I recommend the sites elsewhere on the island since these cabins would have *a lot* of foot traffic passing in front of them all day long. If you choose to camp at Cedar Spring, be forewarned that you’ll have every boat load of the Daytripper walking right in front of you from 9:00 am – 5:30 pm. If you don’t care about that and want the convenience of a short walk with your bags, then… this is the place for you.

The start of the "Lookout Trail".
The start of the “Lookout Trail”.

Just behind the main office, you’ll find the trail junction where you can head off in a few directions. We chose to take the loop of the southern part of the island, over to Christian Beach, down to Beausoleil Point and back up to Cedar Spring. The park map isn’t great at offering info on the real distances, but I can tell you now, we ended up hiking for about 12 kms. Suffice it to say, I’m very impressed with the mother of my child! In my mind, a pregnant woman is the strongest creature in the world. The trail is relatively flat, so it wasn’t that challenging. It was a bit longer than we expected, but it was worth it! Beautiful scenery. The bugs got to be a bit much on the final stretch coming back up to Cedar Spring from Beausoleil Point, so stick to the outskirts of the park in warm weather if you want to avoid them.

FYI, the “lookout” on the Lookout Trail, is no longer a lookout now that the trees have matured. There’s still a wooden landing, but you’ll be staring into the forest. It’s a good connector trail to Christian Beach.

View from the Lookout Trail along the way to Christian Beach.

Christian Beach on the west side of the island.
An island just off the coast of the park.

There are a few cabins for rent on Christian Beach, and while they are still along the trail (meaning: you’ll see some foot traffic passing in front of you), it’s a more remote part of the island and therefore, more secluded. These cabins look quite new and well maintained. Each has a nice veranda. As I understand it, you have to arrange your own transportation there. I heard that water taxis cost about $60 each way.

DSCN0150

DSCN0151

DSCN0152

Beausoleil Point is a nice wide spot with a gazebo, several picnic tables, BBQ stands and a porta-potty.

DSCN0166

DSCN0162

DSCN0161

DSCN0160

As you get back up towards Cedar Spring, you can take the Heritage Trail, a side trail that passes by a First Nations (Anishnaabe) cemetary and the site of a former settlement. One feature is a lovely flag stone walkway.DSCN0172

DSCN0174

DSCN0176

DSCN0177

DSCN0178

Georgian Bay Islands National Park is a fantastic park. I really can’t wait to get back here to explore the rest of the island and spend a few nights. One of the crown jewels of our park system, for sure.

Wawanosh Valley Conservation Area

I gave myself the moniker “Canadian Parkhound” for a reason: I search for parks. It began while living in Toronto and my desire to find trails that were fun to hike (meaning: beautiful and hopefully a bit challenging) as well as private and secluded. It’s pretty much impossible to find a hiking trail in the big city that could be classified as private or secluded. So, I began to explore the Caledon region and the Bruce Trail when and where possible. Of course, I love the big National and Provincial Parks, but I’ll take a good conservation area any day. Forks of the Credit is a nice hike, but it’s pretty busy. Whenever I’m driving through a new area, I’m always on the lookout for a local trail. No park is too big or too small for me.

This summer, I’m working at the Blyth Festival in Blyth Ontario (come see “Seeds” or “Fury”, folks! You’ll see the Canadian Parkhound in action on stage!). When I’m here, I live in the small town of Auburn, just 10 minutes west of Blyth towards Lake Huron. This area is peppered with Provincial Parks (i.e. – The Pinery, Point Farms) and they’re quite lovely. There are also a few Conservation Areas around here (Falls Reserve) and Wawanosh is just up the Donnybrook Line, about 10 minutes north of my place. There is something about a conservation area that I just love. Usually, they’re quite small and can often be found in unexpected places. As such, these parks are not heavily traveled.

Wawanosh Valley Conservation Area

Wawanosh Valley Conservation Area is a well-kept, forested area situated along the Maitland River. There is a simple trail system consisting of a large loop that has a few secondary trails that will take you through different parts of the forest with a nice section that follows along the river.

IMG_6403

DSCN0098

Starting off at the Nature Centre, you’ll begin with a nicely groomed trail. Early on and close to the Nature Centre, you can go down to the creek…

IMG_6400 IMG_6399

I’ve been here at least a dozen times over the past two years and I have never seen another soul (save, of course, for birds and two deer). Aside from myself, I think that the only other folks who show up here in the summer are the maintenance crew. It’s obviously a great educational center, so I imagine that there is more traffic here during the school year. It’s a perfect place for a quiet hike by yourself.

DSCN0105 DSCN0102 DSCN0101 DSCN0100

Taking the large loop, you can circumnavigate the entire area, or you can cut through the forest at a few different points. The forest is beautiful and will take you through a variety of tree stands. The scenery is quite diverse.

DSCN0107 DSCN0114 DSCN0103 DSCN0104 DSCN0124

Ultimately, the trail will bring alongside the Maitland River. A gorgeous and pristine area.

There is a camping area available, but the access to that portion of the park is further north along the Donnybrook Line by a few kilometres. I’ve driven through it and, at the time, there were about 8-10 trailers there that looked like they were seasonal guests. It’s small and cute, but you kind of get the feeling that you’d be moving into a small village that already exists. I’m sure you’d feel welcome there, but you’d definitely be in the company of others if you chose to stay there. If you want to have some privacy, you might be better off at Falls Reserve or Point Farms.

Wawanosh is in the heart of Huron County farmland. I think that it’s really only known by locals, and if you want a place for a nice hike, picnic, and a short visit, make sure to take the time to visit Wawanosh.

Degree of difficulty: Easy. I’ve managed to eke out about 90 minutes of hiking by exploring the various side trails and have done the large loop in about 35 minutes while power-hiking. I usually hike with my large backpack on. I do this to add resistance. It’s my “gym membership” as it were. It adds about 50 pounds and doubles as training for when I actually get out into the backwoods and helps my body to not be shocked when I hike with that amount of weight on my back. If you’re just going out for a leisurely stroll, you could probably spend the better part of two hours on these trails and also speed out of there quickly if you needed to.

Next up: Falls Reserve and Point Farms reviews!

Canoe Lake to Tom Thomson Lake, May 2015

Yes… it has been awhile, hasn’t it? Ah, life. It gets in the way of camping. Finding the time to get into the backcountry is a real challenge. Luckily, I made sure to *make time* last month and I got back in the proverbial saddle and hauled ass into the bush once again. This time, I made the pilgrimage. I mean *THE* pilgrimage. That’s right… Canoe Lake. Granted, Canoe Lake is probably the most traveled lake in all of Algonquin, and the chances are good that most readers have kicked off here more than once. Anyway, it’s an iconic place. Here’s my take on it…

Day 1:

After a week of cooking and dehydrating food, packing and re-packing, we got in the car at 5:00 am and headed north. We made great time and were booking our permit at the Canoe Lake access by about 9:30. And, for the first time ever, stopped for breakfast at the restaurant above The Portage Store. Why not? The scenery is great and it was going to be the last feed of fried eggs for a few days.

This really was a trip of a few firsts. Without getting too expository here… this was my first time on Canoe Lake and it was my partner’s first canoe trip in her adult life (she had been on a 5-day trip to the park way back in highschool)… and she’s expecting our first child this fall! Our first family canoe trip, as it were. As such, I planned a route that wasn’t going to be too demanding, and one that would enable us to get out quickly if necessary. After all, we were carrying precious cargo.

So, our permit had us staying on Tom Thomson Lake the first night, Sunbeam Lake on the second and Burnt Island Lake for the third and fourth nights. We’d paddle out the loop through the Joe Lakes and back through to Canoe Lake. Well, that was the plan anyway… but I digress.

We finished breakfast, went downstairs to rent the canoe (16′ ultralight Kevlar – spend the extra few bucks… your back will thank you), loaded up, parked the car and kicked off. Ah, wilderness!

DSCN0010

Full disclosure – I’m a full on Tom Thomson nerd. The mystery, yes. The mystery of his death intrigues me, but I’m even more fascinated by the man himself. I couldn’t help but imagine Thomson as I paddled into Canoe Lake. It’s what I went for, and I was immersed in my imagination right away. Heavy canoes and packs… art supplies, food, dishes, fishing gear, canvas tents… respect, man… Respect! I try to go as ultralight as possible. How they traveled back then just makes me wince at the thought.

We kept to the east end of the lake as there was some chop to the water and this was my partner’s first time in a canoe in decades. We passed by sweet cottages and one even had a woman painting the landscape on a canvas and easel set up on her dock. We passed her silently, so as not to disturb her.  A beautiful sight. The wind was strong enough to make us take the long way around to the entrance into the Joe Lake portage, but that was fine by me. I suggested that we take in the Tom Thomson cairn if possible. However… we couldn’t find it. I couldn’t figure it out. I double and triple checked the map, but we couldn’t see it. Ah, well. On the way back, I promised myself.

Admiring the cottages all along the way, we found the sign directing us to Joe Lake and made it easily to the sandy approach of the portage. It’s an easy 360m. Didn’t even change out of the canoe shoes into the hikers. It’s flat and, with the exception of a slightly mucky spot, there aren’t any roots or rocks or uphill sections. It’s a breeze.

DSCN0012

Within half an hour, we were ready to go on the other side of the portage and kicking off into Joe Lake.

DSCN0020

Along the way, there are some really impressive cottages to get jealous of and daydream over. Keeping to the left of the lake, we paddled by Camp Arowhon, through Teepee Lake, Fawn Lake, Little Doe and found the left turn into Tom Thomson Lake. A mostly completed beaver dam prevented us from paddling straight through, so we had to get out and drag the canoe over in order to continue into Tom Thomson.

Tom Thomson Lake

According to the “Names of Algonquin” book issued by The Friends of Algonquin:

Named (1958) in honour of Tom Thomson (1877-1917), pioneer artist of Algonquin Park, who drowned in Canoe Lake in July 1917. A move to have a lake in Algonquin Park named after Thomson was started by the Canadian Federation of Artists in 1946. The proposal was strongly supported by the late Mark Robinson, at that time retired Park Ranger and Acting Superintendent. It was Robinson who proposed that this lake, formerly known as “Black Bear Lake,” would be appropriate to carry the name. Thomson travelled and painted over much of the area surrounding Canoe Lake and there is no reason to believe that Tom Thomson Lake was in any way special to him.

Once we hit Tom Thomson Lake proper, we were facing some strong winds. We forgot about checking any of the sites along the south and western parts of the lake and seeing as the first three were taken already (some good sites there, by the way), we inspected the fourth one (on the north side of the creek that heads into Bartlett Lake). It was a decent site, but we could hear the guests across the way, who were high school kids with a teacher. We weren’t crazy about the idea of having to listen to them all day and night, and the wind was pretty strong blowing right through the camp. Out of curiosity, we continued onto Bartlett Lake to see what our options were.

Bartlett Lake is a small lake with 4 campsites, at the end of which begins a series of portages. Completely sheltered from the wind, we decided to set up camp here instead of on Tom Thomson Lake. We chose the 3rd site on the south east side of the lake.

DSCN0076

After setting up camp, I got straight to preparing dinner:

Thai Noodles with Peanut Sauce

All measurements are just ballparked here. I can’t find the original recipe and I tend to modify as I go anyway. Measure to suit your own taste.

1 cup egg noodles

1/4 cup mixed dehydrated veg (i.e. – corn, peas)

1 teaspoon garlic salt or powder

1 teaspoon ginger

1/8th teaspoon chili flakes

1/2 teaspoon salt

1/2 teaspoon pepper

2 tablespoons peanut butter

Combine all ingredients in a pot with about 1 1/2 cups of water. Soak for 15 – 20 minutes then add medium heat. Allow for rehydration, adding water if necessary. If it’s too watery, just keep on the heat and allow it to reduce a bit.

DSCN0052

It’s amazing how great food tastes in the bush. Even a package of Lipton’s Cup-A-Soup will lift your spirits, but if you put even a small amount of effort into creating your own backcountry menu, you’ll be over the moon with the return on investment. One of the great joys in (my) life is eating real food out in the middle of nowhere. The thai noodles were spectacular.

Sun began to set, we cleaned up and hung our “bear bag”. The mosquitoes and just arrived days before we did, so we dove into the tent pretty much right away. As we settled in, my partner remarked at how surprised she was with the workout that her arms received that day. At this point I said, “You know… being pregnant and all… you’re in charge of this trip. If you want to head back at any point, just say the word. I won’t be disappointed. Safety first.” Our surroundings were beautiful and the workout wasn’t so hard on her that she couldn’t continue, but the bugs were… a challenge. We decided to sleep on it and see what the next day would bring.

At about 2:30 – 3:00 am, I woke up to Nicole sitting upright trying to kill a rogue mosquito. “Are you OK?”, I asked. “This f***ing mosquito won’t DIE! I have to pee. My back’s sore. The baby’s doing a gymnastic routine. I am NOT A HAPPY CAMPER.”, was her reply. I couldn’t help myself, but I laughed so hard at hearing the “not a happy camper” line used in the correct setting. I’d never heard the phrase used while actually camping. It works well in its intended setting. I said, “well, go pee… we’ll wait until sunlight to make any decisions.”

Day 2:

When morning finally came, she had slept the worst of it off and I made chocolate chip pancakes to take the edge off.

DSCN0060

Nicole felt much better and we talked about what to do with our day. Our planned route had us portaging through to Sunbeam Lake and spending the night there. Environment Canada was forecasting a thunderstorm that afternoon, so we opted to stay put and just rest. We ate and paddled and napped. We didn’t see a single canoe come through to access the portage.

At this point I want to address a comment that I received on an earlier blog post about straying from the itinerary that we gave at the Permit Office. A reader expressed some concern about the perception of disrespect to fellow campers by veering from “the plan” and possibly depriving others of a site.

If, and I have to emphasize *if*, we were ever in a situation that had us taking up the last available site on a lake that we weren’t booked on and another group came along needing the site and held a permit for it, we would most definitely concede and offer it up (weather and safety permitting, of course). If it were an unsafe situation to leave, we would make room and offer all the hospitality that we could. That said, I have never, ever, found myself in a situation like this. Especially in Algonquin Park, whenever I amend my original plan, I’ve always been the only person on the lake with extra campsites aplenty.

That night, we ate pasta with ratatouille and tomato sauce. Sorry, no pictures. Again, we hit the sack agreeing to decide on the next day when we woke up. For this trip, we bought two new Thermarest sleeping pads. Nice, thick red ones that velcro together and provide amazing comfort while sleeping on the ground. I usually prefer to sleep in a hammock, but these pads are great for tent sleeping. They’re bulky and heavy, but easy enough for a canoe trip.

Day 3:

Upon waking, Nicole knew that she wanted to leave the backwoods despite having a better sleep the night before. There were some clouds and again, Environment Canada was calling for that elusive thunderstorm to hit. Portaging in the rain would have been too much, and ensconcing ourselves deeper into the bush wasn’t appealing to my mosquito-weary partner.

We packed up camp and pushed off back into Tom Thomson Lake, retracing our steps back through to Canoe Lake. Determined to find the cairn to Thomson, it was much easier to spot coming from the other direction. In fact, I had to laugh at my ability to miss it the first time through. It’s really quite well marked and obvious.

We came down the other side of Canoe Lake on the way back to the Portage Store, passing Camp Wapomeo and the old site of the village of Mowat. I daydreamed of the places that Tom Thomson would have graced back in the day.

Sure, we didn’t get through our planned itinerary, but it was our first “family” canoe trip. Mom’s safety and happiness was the most important thing for me and we’re really looking forward to heading back as a trio. Even though we cut the backwoods camping short, we did stick around for another day driving through the park and getting a motel just outside of Dwight that evening. The following day, we visited antique stores and saw a few more sights. The locals that we encountered were all complaining about how fierce the bugs were this year. So… that helped ease the pain of the welts we were sporting…

In my estimation, it was a great trip. I got a few days in the backwoods with my partner, and I finally got my Tom Thomson pilgrimage.

DSCN0082


O.S.A. Lake, Killarney, May 15-18, 2013

It’s been 2 years since the last canoe trip with my lady (see: Ragged Lake, 3 days/2 nights). After my first taste of Killarney last August (see: Killarney 3 days/4 nights), I just had to bring her to see the incredible scenery that this park has to offer. Knowing that O.S.A. Lake is usually fully booked, I called ahead with the intention of reserving a site. The person taking the reservation told me that there was plenty of availability for the days that we were planning, so I cancelled the reservation (to save on the extra fees) and was able to book three nights upon arrival at the George Lake access. The lake was indeed fully booked for the long weekend, so we had just hit that sweet spot in the schedule. Personally, I think that this is one of the best times of year to visit a park. The weather is generally favourable, the bugs aren’t crazy-making yet, and we leave the park as the throngs of ill-equipped party paddlers jam the lakes and portages.

Day 1

We arrived at the George Lake access point around 10:00 am. The parking lot was empty. We walked right in and booked three nights on O.S.A. Lake and the staff let us know that we’d have the lake pretty much to ourselves until Saturday (our departure date). After that, we drove down to the canoe launch where our rental canoe from Killarney Kanoes awaited us, and we were on the water by 10:30 am.

Side note: while we were getting our permit, I mentioned to the office staff that I had read a post on myccr.com (a terrific resource, I love the trip report forum), about a bear encounter on Muriel Lake a few weeks before. The staff hadn’t heard of it at all. I’ve never had a bear encounter or sighting, but it’s worth mentioning that you can get better information on sites like myccr.com than you can from some of the park staff.

The skies were clear and the wind was nothing more than a pleasant breeze. We reached the portage from George Lake into Freeland Lake within the hour. It’s a tiny 80m portage with a well-built dock right by a picturesque little waterfall. Looking back at George, the wind had just picked up and we were thankful to have avoided the choppy water that had just been brewed behind us.

Freeland Lake is calm and shallow by comparison (with no campsites) and it only took about 20 minutes to get from one end to the other. This early in the season it’s free and clear of vegetation, but I bet that changes quickly with the warm weather. The approach to the 380m portage into Killarney Lake wasn’t too mucky (another benefit to traveling early in the season), and the portage itself is very easy.

The water in Killarney Lake is quite transparent and beautiful. As you kick off, you’ll find yourself winding through little inlets, points and bays along the way to O.S.A. One of my favourite experiences while paddling in Killarney is the trick of the eye that occurs when paddling around a point with the quartzite mountains in the distance. The optical illusion of the scenery moving in opposite directions gives the feel of watching two back drops being pulled away to “reveal” the mountains. It’s as if you’re watching one of the oldest theatre tricks… two scenic flats being pulled by stage hands.

There are two portages from Killarney Lake into O.S.A. The first one is a 455m, but if you paddle a bit further into the shallow end of the lake, there is a much shorter (and flatter) 130m. We opted for the short portage. If you choose this route, be on the lookout for dead trees lurking just below the surface. Also, you’ll serve yourself best by choosing to go to the left of the beaver dam that sits in the middle (fewer trees that way). There is a low-lying section indicated on the map that we were just able to wiggle our way through into the last little bay of Killarney that gives you access to the 130m. (Note: on our way out of the park, this low area had the beginnings of a beaver dam being built, so it was a quick lift-over as opposed to a tight “scootch through”).

As we made our way through the short 130m portage, we were excited to finally lay eyes on the fabled O.S.A. Lake. We could hear the wind and the waves lapping at the shore. At the end, we were met with strong wind and a view of a very choppy lake. White cap choppy. For everything that I’ve ever read about O.S.A. (and believe me, I love to read anything and everything that I can find out about a route during the months leading up to a trip), I hadn’t read anything about how strong the wind can get on O.S.A. I’d read about George Lake being a bit of a wind tunnel, but nothing about O.S.A. That said – we were finally here! And it was stunning despite the wind and waves.

Determined to make it to site #29 (on the large island), we tackled the waves. Right out of the gate, I knew we were in for some trouble. We were in swells and white caps from the first moment. I wanted to turn back but it took some figuring to turn around in high waves without capsizing. The water is fiercely cold right now and the last thing I wanted was a swim and wet gear. Mercifully, the lake turned our canoe around and sent us back to shore.

The 130m portage is a pretty little place to spend an hour or two… we tied up the canoe and carried our gear to the leeward side of the portage to have lunch, listen to the weather radio and plan our next move. The weather report was telling us that a strong wind warning was in effect. 40km/hr gusting to 60km/hr. Since buying the weather radio, I’ve developed a bit of an addiction to listening to it every hour or so, and there was no mention of wind prior to our arrival. There had been no hint of strong wind until the moment that we were facing it. We decided to try again when it died down and make it to the first site (#28) by the portage.

After waiting about an hour or so, the wind was still strong, but the lake appeared to be a little less choppy. Foolishly, we decided to make another attempt. Our goal was to get out past the point to the southwest of the portage, thinking that the wind would push us to site #28. The wind was a *little* less intense than it was earlier and we did indeed make it out further than our previous try. I was doing everything in my power to keep the nose to the wind and not be blown sideways and into the water. We were paddling as hard as we could and moving backwards once we got close to the point. As we inched forward beyond the point we could see a canoe at #28 and a fellow sitting at the site, cross-legged, enjoying the view of two paddlers in the choppy water, moving 1 inch forward and 2 feet back. Once we saw that the campsite was taken, we struggled to get the canoe over to the shore and plan our next move.

It was as if Mother Nature was saying, “today’s not the day”. We sat on the point between the portage and site #28 for an hour or so debating our next move. Being hammock campers, we can sleep almost anywhere. We weighed our options of staying put, turning back to sling the hammocks at the portage or doubling back even further to Killarney Lake and picking the closest site. We were fairly certain that the park wasn’t full, so we chose to head back to Killarney Lake after a very quick and nervous paddle back to the portage.

The difference in the wind between the two lakes was remarkable. It was still windy on Killarney at times, but we were thankful to have a home for the night. Site #23 on Killarney Lake is the closest to the portage and has a covered thunderbox. Luxury. The wind did subside a bit for the night, but we stuck to a dinner of jerky and gorp rather than fire up the stove. A small campfire was had (and thoroughly doused) before turning in for the night. We fell asleep to an orchestra of loons, crickets, frogs and a lone wolf.

Day 2

We were up and on the water by 9:00 am, hoping that the folks at #28 on O.S.A. weren’t heading to the island site that we were aiming for. Being well acquainted with the 130m portage, we made quick work of getting our gear across and thrilled at the sight of an O.S.A. Lake that had mere ripples on it compared to what we saw the day before. There was still a bit of wind to contend with (and some nerves, I’ll ‘fess up to that), so we stayed close to the south shore, avoiding crossing in open water until absolutely necessary. The fellow at site #28 was sitting in the same spot, this time with his lady. We waved and said “good morning”, knowing happily that the odds on getting site #29 were good. If you look at the map, you’ll see that there is a larger, longer point to the southwest of site #28, putting you into open water again. There is nothing like a crosswind at a point to make you a better paddler…

The wind was coming from the northwest and the safest way to the large island with site #29 was to go around the leeward sides of the islands and approach it from the south. Despite the challenging winds, the vista that unfolds when you come past that large point is incredible. All of a sudden, you’re treated to a view of the bay and the large mountain that sits there covered with a huge stand of birch. Worth every trial and tribulation. This would be the view from our site for the next 3 days. We were beyond happy to arrive at site #29.

Our first order of business was breakfast. We lounged over coffee and gorp for well over an hour on the south side of the island. The wind was picking up again on the windward side and we’d had enough of paddling in it. There was a plan on the table to make a day trip to the infamous “Pig” for a hike, but we scrapped that in favour of exploring the island.

The island is just shy of 1 km long and is home to another, albeit retired, campsite. You can easily spend an afternoon exploring the place, climbing the rocks and finding great little spots everywhere. At the far end of the island, we saw evidence of a recent visit by a bear. There were distinct paw prints and then a full-body depression in the pine needles on the ground that looked like a springtime, bear version of a “snow angel”. That was our only sighting of any bear evidence for the entire trip.

Days 3, 4 and out…

We really didn’t do a whole lot on the third day aside from taking a short day trip through Muriel Lake (where the nuisance bear had been reported) into Artist Lake. It was clear and sunny and the water was tropical looking. So tempting to dive in, but the water was still about 4 degrees so… no swimming. We were hoping to make our way to Baie Fine for the day, but we couldn’t find the portage out of Artist Lake. We did pass a solo paddler who had come from that direction and he said that the water level was way down and that he had to pull his canoe for the better part of a kilometer. So, we decided to make our way back to O.S.A. and enjoy the rest of the day exploring the islands. It was easy to kill a few hours just staring at the horizon.

The next morning, we packed up and started the journey out of the park. Sure enough, the “May Two-Four” party paddlers were starting to clog the portages. It just amazes me to see what people will wear and carry into the backcountry. One very affluent looking family were wearing flip-flops, Chanel sunglasses, t-shirts and jeans. They looked miserable. Another pair of guys had a bear barrel full of liquor and smokes. It takes all kinds…

Killarney really is the “crown jewel” of the Ontario Parks.  My next trek into the park will likely be a loop that includes Nellie Lake. I’m counting down the days until the next…

Aren’t you afraid of bears when you sleep in a hammock?

Image

This post was inspired by a comment that I received today. Andrew asked, “never concerned about animals (bears) when sleeping in a hammock??”. 10 times out of 10, whenever I mention that I sleep in a hammock I get asked this question, so fair enough. Here’s my perspective on the question.

Yes, I concern myself with animal encounters. No, I’m not worried about them.

I came to find out about hammock camping after researching solo tents. Previously I only had a 3-man tent and I quickly discovered just how heavy it was for solo tripping. I checked out the Hennessy Hammock, read the reviews, testimonials, watched a bunch of clips on YouTube and decided to take the plunge. The sales guy at MEC did make a crack about being a “bear sausage”, but that didn’t deter me. My first hammock was the Hennessy “Ultralite”. I’ve since added the “Expedition” model to my gear.

I actually feel safer in my hammock than I do in a tent. When it comes right down to it, you’re wrapped in nylon and you find yourself in the extremely rare situation to have a predaceous bear clamped down on your ass… it won’t matter which shelter you’re in.

That said, I’m not worried, but I do concern myself with the idea and take precautions.

  1. I keep my site fastidiously clean and I hang my food in a well sealed bag as far away from my sleeping area as possible.
  2. I never eat in my tent. Ever.
  3. I carry bear spray.

The great thing about the Hennessy Hammock (and why I feel safer in it than a tent), is that the upper half of the hammock is “no see-um” mesh and you can see outside (even with the fly up) much easier than if you’re in a tent. You have a wider range of vision and therefore, more reaction time if you do in fact get an unwanted visitor to your site. There is a ridge line inside the hammock that you can clip handy items to (ie. – bear spray, hunting knife, air horn etc.).

View from inside the Hammock (Guskewa Lake, Algonquin) IMG_1852

I have yet to see a bear.

Famous last words, perhaps. My feeling is that, if it should come to pass that I meet my end by bear attack or by a mauling from a bull moose during the rut (or a deranged wolf that hasn’t eaten in months)… at least they’ll have a helluva story to tell at my funeral. I’m not sure that cancer or a car crash would be a more desirable way, even though those situations are more likely (statistically speaking).
I visit the backwoods knowing that I’m not on the menu and that I need to give the true inhabitants of the woods a great deal of respect and a wide berth. I haven’t seen a bear during my travels yet, but I’d like to… from a safe distance, of course.

During my last trip (blog post to come), we did see clear evidence of a bear visit on the island that our site was on. I’m sure it took one whiff of us and gave us the wide berth.

They’re out there though. No doubt about it. When I came back from a solo trip a few years ago, this is what my car looked like…

IMG_2095

Food Review: Backcountry Pantry Shepard’s Pie

Food, the amount and weight of, has been a constant source of meditation for me when I decide to tackle the trail. Even though I envision my backcountry trips to be full of awe and wonderment during the planning stages, in reality, the food that you bring has a pretty big impact on the experience. I’ve broken my back carrying too much food, and sat in the backwoods, looking at a ridiculous assortment of spices and grains for too long not to consider what prepared backwoods meals that might be available out there. Join me as I buy and taste what offerings I find during my search…

Backcountry Pantry: Shepard’s Pie

Packaging:

Aluminum, “prepare in bag”.

Backcountry Pantry Shepard’s Pie

Preparation:

Add boiling water while stirring food. Seal bag and let sit for 13 minutes.

Backcountry Pantry Shepard’s Pie, inside package view.

Taste:

Salty with a tang that hit the sides of the tongue throughout. A bit of a potato soup by our standards, if following the recipe for exact water measurements. The first few bites after a long day in the middle of nowhere may be rewarding, but finishing it may be a chore. Lots of powdered spices that aren’t well balanced  beyond, “salty”.

Full disclosure: I can’t find any love for instant potatoes. This product didn’t bring me around.

Portion:

Two people.

Ratings:

Backwoods: Thumbs down. Too expensive for food that can easily be prepared at home for less $$.

RV/ car camping: Skip it.

Sandbanks Provincial Park, September 2011

Editor’s note: unfortunately, we lost our pictures of this trip. The photos used in this blog post are taken from a Google images search of “Sandbanks Provincial Park”.

Some weekends, you just need to get out of the city. For us, ‘some weekends’ = ‘many weekends’. However, it isn’t always feasible to put life on hold to the extent that is required for a backwoods experience in a place like Algonquin and, depending on the season, it isn’t always worth it (read: bugs). Sandbanks Provincial Park is the perfect park for getting to a beautiful beach with warm, clean water. Sure, the park is usually crowded, but it’s still the best Provincial Park getaway in Southern Ontario within decent driving distance of the GTA.

Beach at Sandbanks Provincial Park

Even though it was September and a week after Labour Day, the park was pretty full. We drove around the campground and were able to snag a good campsite that was private. It was set in from the road and had good tree coverage. Many of the sites in the loops are completely exposed and better for families or large groups. Every single site that abutted the beach was taken, primarily by truck campers and trailers.

Generally speaking, I’m not a huge fan of “car camping”. With the exception of our “Gaspé to New Brunswick” week long journey, we avoid car camping in favour of getting into the woods. That said, my girlfriend and I have been on the hunt for the best swimming hole within a few hours of Toronto. So far, Sandbanks is the only park where we’re willing to brave the crowds and noise to spend an evening.

Dune at Sandbanks

As soon as we set up our site, we went and lounged on the Dunes Beach at West Lake and swam until dinner time. Considering how busy the park was, we were happy to see that the beach wasn’t totally packed. The water here is warm and clean. It’s quite shallow for the first few hundred meters, making it very family friendly and ideal for frisbee-throwing.

After dinner, we headed for a sunset drive around the park and checked out the beach that is directly on Lake Ontario. The water here is more rough, not being protected by land the same way that West Lake is. Still gorgeous and great for strong swimmers.

The next day, we packed up our site and headed for the easy hike along the Cedar Sands Trail. There are many interpretive signs along the way describing the habitat and history of the Sandbanks.

We had a good dose of the beach and, as the clouds started to roll in, my girlfriend went into Lake Ontario for one more wrestle with the waves.

Beach at Sandbanks – Lake Ontario

If you’re looking for a great, quick getaway – this is it. Look no further. The only park (in my estimation), that comes close would be, Long Point Provincial Park (similar beach, although the water is better in Sandbanks).

Sandbanks Provincial Park:

Pros: swimming, beaches

Cons: heavily populated

Food Review: Harvest Foodworks Spaghettini Italiano

Food, the amount and weight of, has been a constant source of meditation for me when I decide to tackle the trail. Even though I envision my backcountry trips to be full of awe and wonderment during the planning stages, in reality, the food that you bring has a pretty big impact on the experience. I’ve broken my back carrying too much food, and sat in the backwoods, looking at a ridiculous assortment of spices and grains for too long not to consider what prepared backwoods meals that might be available out there. Join me as I buy and taste what offerings I find during my search…

Harvest FoodworksSpaghettini Italiano

Packaging:

At first glance, this product looks like it can be prepared in the bag (perhaps due to the convenient volume measurements printed on the outer bag), but this is not a “prepare in bag” recipe. Inside, you’ll find three additional packages (plastic, mylar, foil/paper). These are wrapped in a sheet of plain 8×11″ paper containing the description, nutritional facts, ingredients and cooking instructions.

Image

Preparation:

Stir the pasta and veg into a pot of boiling water and reduce to medium for 5 minutes. Remove from heat and and the sauce and spice packages (to taste). Return to heat for 3 minutes or until thickened.

Spice package, Harvest Foodworks Spaghettini Italiano

Taste:

Salty. During preparation, it wasn’t the most appealing smell. It smelled heavily of soup base, reminiscent of Lipton Cup-A-Soup or the soup base found at The Bulk Barn. However, on first taste, it was not as disappointing as the initial smell. The texture of the pasta was al dente and the soy-based “ground beef” was acceptable*. It was quite saucy and the fact that it is a powder-based tomato sauce wasn’t so appealing. It was tangy as opposed to dynamic. There were strong overtones of soup base-type flavours throughout the tomato sauce.

Portion:

Two people.

Price:

$8.95 CAN

Ratings:

Backwoods: One thumb (out of two). If you can’t prepare a meal in time, this will suffice and the portion is definitely for two people (or one really hungry camper). You’ll probably be grateful for the first few mouthfuls and spend the rest of the time wondering why you’re paying pub-style prices for less than pub-style pasta. All the same, if you didn’t have time to prepare your own, Harvest Foodworks Spaghettini will more than likely warm your belly when you need it most.

RV/ car camping: Skip it.

(according to this person’s taste)